Clothing Tech Pack Guide: What to Include for Manufacturing
A practical manufacturer-side guide to technical flats, measurements, fabrics, trims, artwork, tolerances, sampling, approvals, and quality control.
A clothing tech pack is the working specification that translates a design into measurable manufacturing instructions. It should define the garment views, construction, point-of-measurement method, size specifications, materials, colors, trims, artwork, labels, packaging, tolerances, and revision history.
A strong tech pack does not guarantee a perfect first sample, but it reduces preventable assumptions. The approved sample, latest technical file, material approvals, and written change records should work together as the production standard.
A technical document that explains how a garment should be developed, sampled, manufactured, inspected, labeled, and packed.
Technical flats, POM measurements, tolerances, BOM, fabrics, color standards, trims, artwork, labels, packaging, and revision records.
No. Images show appearance but usually do not define measurements, construction, material behavior, artwork placement, or quality criteria.
Yes. An ODM or development team can translate sketches, references, and product ideas into technical documents, subject to project review.
No. The tech pack provides instructions; the approved sample confirms the physical result, hand feel, fit, and workmanship.
Timing varies with product complexity, the quality of the source information, the number of views, grading needs, and unresolved construction details.
Creating a successful clothing collection requires more than a strong visual idea. A sketch, mood board, or reference garment can communicate direction, but a manufacturer still needs a controlled technical standard before pattern development, sampling, costing, and bulk production can be managed responsibly.
A professional clothing tech pack is the communication bridge between designers, product developers, pattern makers, sourcing teams, factories, and quality inspectors. It translates creative decisions into instructions that can be reviewed, measured, revised, approved, and repeated.
VANRD supports apparel brands through OEM and ODM product development, including technical review, sampling, customization, and manufacturing planning. This guide explains what belongs in a tech pack and how factories use it from the manufacturer's perspective.
What Is a Clothing Tech Pack?
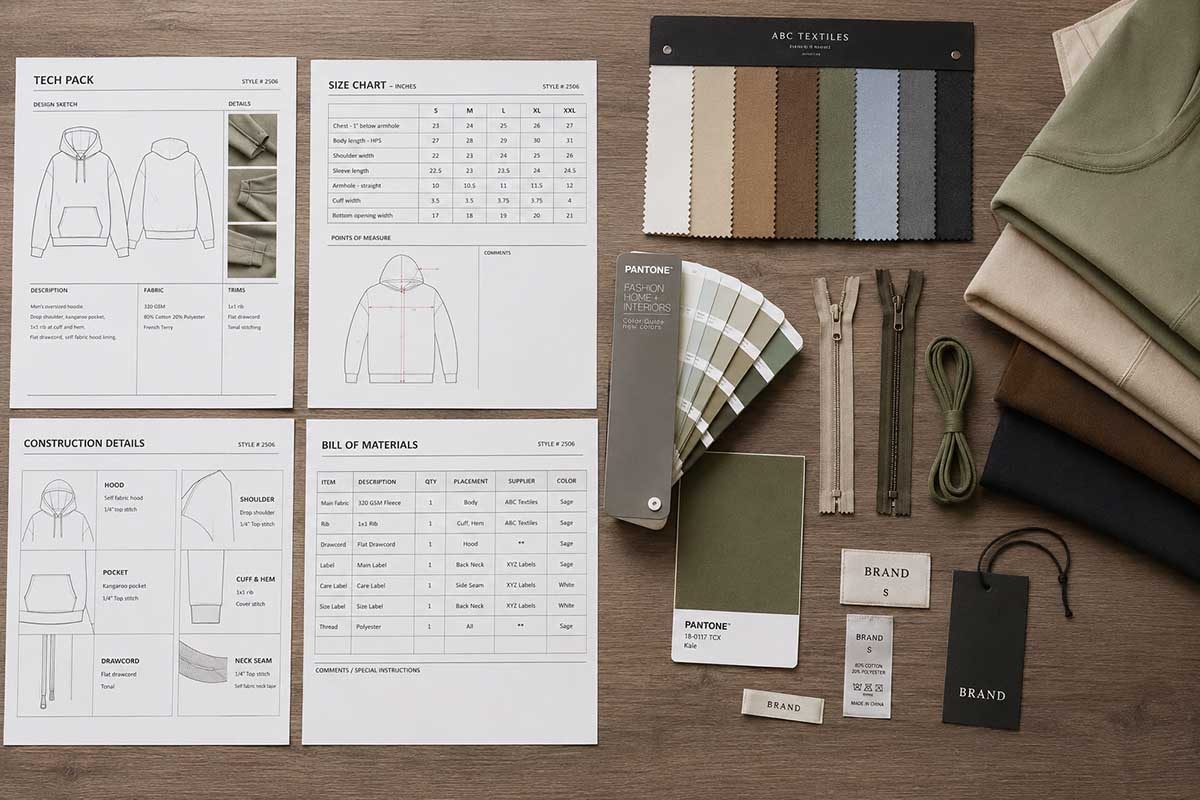
A clothing tech pack—also called an apparel tech pack or garment tech pack—is a structured production document containing the technical information required to develop and manufacture a garment.
A fashion illustration primarily communicates style. A tech pack explains how the product should be built. For an oversized hoodie, for example, a factory still needs to know the base-size measurements, shoulder position, fabric composition and weight, hood construction, rib specification, artwork placement, stitching, labels, packaging, and acceptable measurement variation.
A complete tech pack allows a factory to identify missing information before cutting begins. An incomplete file does not always stop development, but every unresolved detail becomes an assumption, question, cost variable, or approval risk.
- Design interpretation: silhouette, panels, seams, pockets, closures, and visible details.
- Fit and sizing: POM definitions, base-size measurements, grading, and tolerances.
- Materials: main fabric, lining, interlining, rib, trims, hardware, and packaging.
- Decoration: artwork size, placement, color, method, and reference points.
- Approval: sample comments, revision versions, material approval, and production release.
- Quality control: inspection points, workmanship expectations, and packing requirements.
Why Fashion Brands Need a Professional Tech Pack
Reference images are useful, but they rarely explain the technical decisions that create the final garment. Two factories can interpret the same image differently because they may choose different fabric weights, seam methods, fit assumptions, trims, wash processes, or artwork dimensions.
Clear specifications allow suppliers to estimate fabric consumption, process complexity, trims, decoration, packaging, and labor using fewer assumptions.
The first sample can be reviewed against documented measurements, materials, and construction instead of subjective memory.
Revisions can be added to the latest file, reducing the risk that old comments or verbal instructions are used in production.
Approved specifications give future orders a defined starting point when colors, sizes, materials, or production timing change.
Established brands usually need repeatability, grading control, material continuity, inspection standards, and clear revision ownership. Private label brands often need additional detail for labels, hangtags, packaging, artwork, and retail presentation. Designer-led and creator-led brands may require more support translating silhouette, references, and unconventional details into manufacturable construction.
There is no universal price. Cost depends on the number of styles and colorways, product complexity, drawing requirements, POM development, grading, BOM detail, artwork, construction notes, and the quality of the information already available. A simple T-shirt and a lined multi-pocket jacket should not be expected to require the same level of work.
A factory review can improve an existing file, but the scope should be clear: technical review, redesign, pattern development, grading, and full tech-pack creation are different services.
What Should Be Included in a Clothing Tech Pack?
A useful tech pack should be organized so that each department can find the information it needs without searching through unrelated pages. The structure below can be used as a copy-ready starting point.
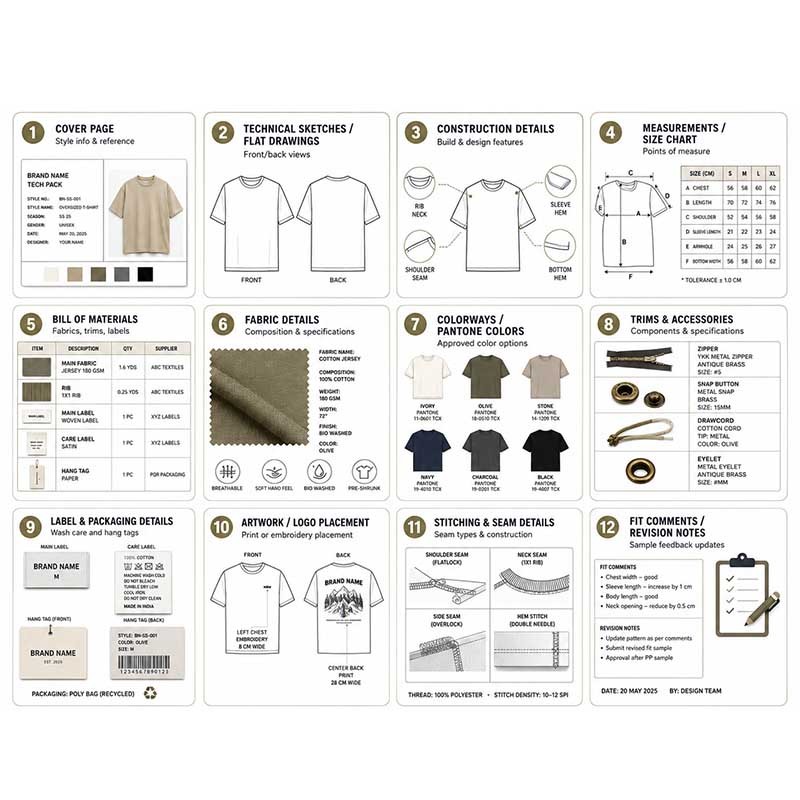
Style name, style number, season, category, designer, date, version, and contact information.
Front, back, side, interior, and enlarged detail views with construction callouts.
Base-size values, POM illustrations, grading rules, tolerances, and measurement method.
Main fabric, lining, rib, interlining, thread, trims, hardware, labels, and packaging.
Color names, textile references, physical swatches, lab dips, and contrast-color mapping.
Files, dimensions, placement coordinates, method, thread or ink colors, and approval reference.
Main label, size and care labels, hangtags, folding, polybag, carton, and barcode instructions.
Version number, date, change description, responsible person, and approval status.
Technical flats should focus on construction rather than fashion illustration. Show seam lines, panel divisions, pockets, closures, hardware, topstitching, lining, internal details, and enlarged views of complex areas. Use consistent line weight and labels so that the manufacturer can distinguish design lines from measurement arrows or artwork boundaries.
Every measurement should identify the exact point of measurement, the base size, the measuring method, the grade to other sizes when applicable, and the agreed tolerance. A label such as “chest width” is incomplete unless the file also explains where below the armhole it is measured and whether the garment is laid flat, relaxed, stretched, or closed.
Define composition, weight, construction, width when relevant, surface character, stretch, shrinkage expectations, finishing, and performance requirements. For specialized fabrics, include a physical swatch or approved supplier reference. Review available options through the manufacturer's fabric and garment technique capabilities.
For textile colors, use a suitable Pantone FHI TCX reference when available, supported by an approved physical fabric swatch or lab dip. TPG references may be useful for paper-based or hard-surface coordination when appropriate. Digital screen color should not be the only production reference.
Specify zipper type and length, puller, button or snap material, drawcord, eyelet, elastic, rib, thread, labels, hangtags, polybags, cartons, folding, barcode location, and any brand-specific presentation requirements. Custom components may have separate minimums and lead times.
Include the production-ready artwork file, finished dimensions, reference points, color information, production method, and expected surface effect. Decoration must be evaluated against the actual fabric because stretch, pile, wash, coating, seams, and garment curvature can change the result.
Garment dye, enzyme wash, acid effects, vintage finishing, seam sealing, quilting, insulation, lining, ventilation, bonded seams, and weather-resistant hardware require detailed instructions and physical approval standards. A descriptive name alone rarely defines the exact visual or performance result.
Measurements, Tolerances, and Color Standards
POM definitions and tolerances should be agreed by product category, fabric behavior, wash process, size range, construction, measurement method, and approved sample. The values below are illustrative starting points for casual apparel—not universal industry standards.
| Measurement Area | Illustrative Starting Point | Why It May Need Adjustment |
|---|---|---|
| Chest width | ±1.0 cm | Stretch, oversized fit, seam position, garment wash, and measuring location |
| Body length | ±1.5 cm | Fabric shrinkage, curved hem, garment dye, and center-back versus side measurement |
| Sleeve length | ±1.0 cm | Set-in versus raglan construction, cuff method, and shoulder position |
| Shoulder width | ±1.0 cm | Dropped shoulder styling, thick fabric, lining, and seam construction |
| Neck opening | ±0.5 cm | Rib recovery, binding, collar attachment, and fabric stretch |
| Hem opening | ±1.0 cm | Elastic, rib recovery, wash behavior, and finished garment shape |
- Where does the measurement start and end?
- How is the garment positioned during measurement?
- Is the measurement straight, curved, stretched, relaxed, open, or closed?
- Which sample, diagram, and document version controls the result?
How Manufacturers Use Tech Packs During Production
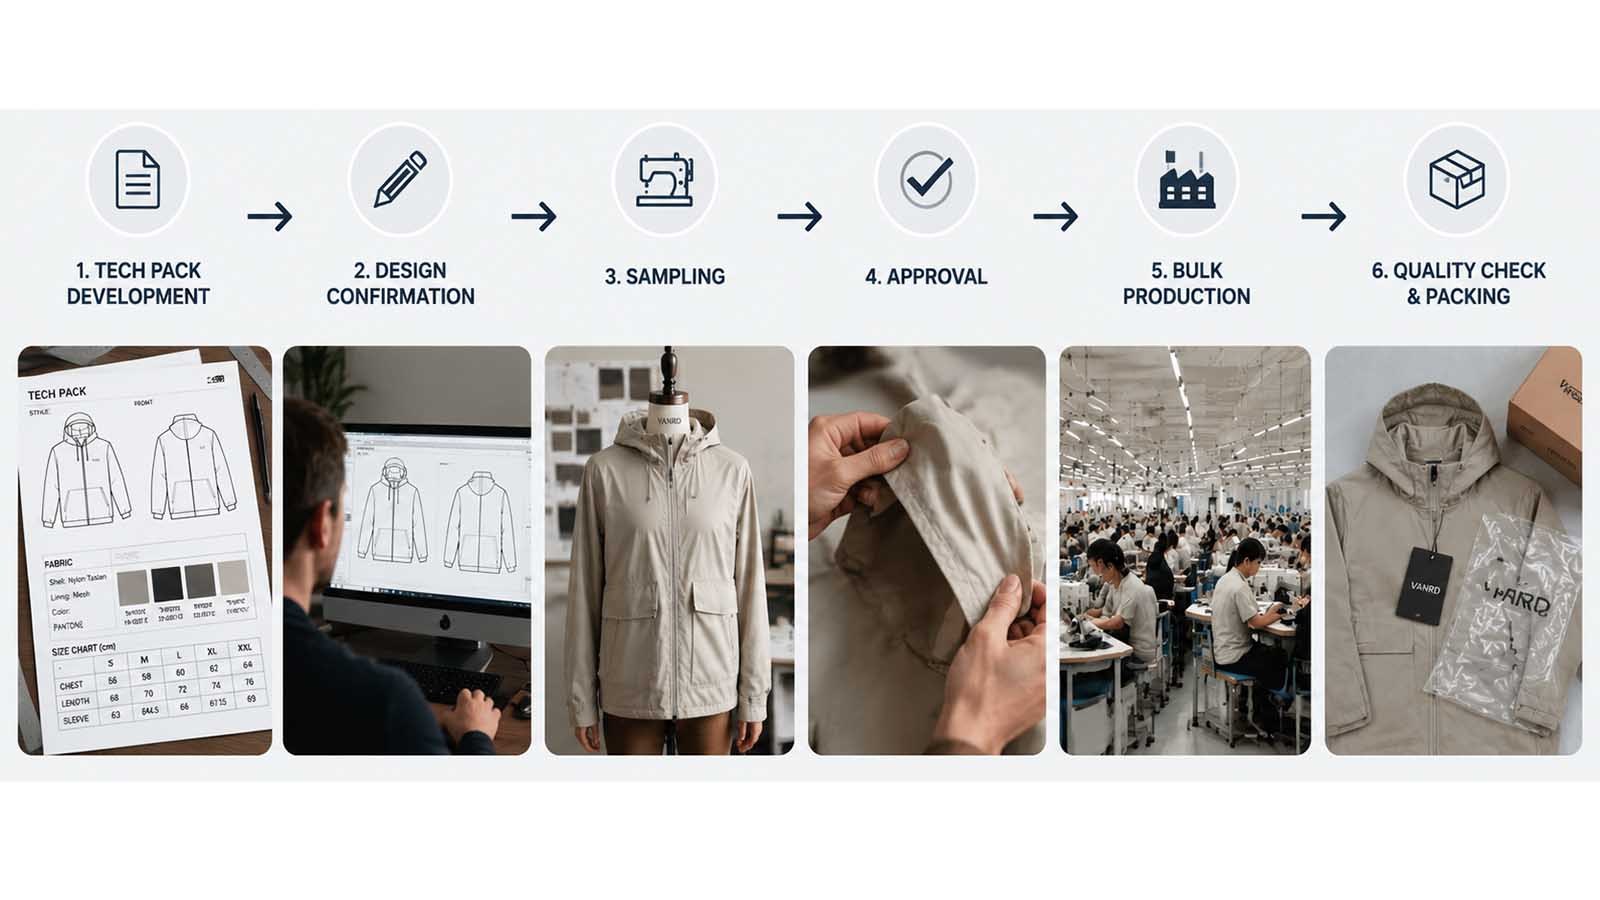
A factory should reference the latest technical information throughout development and production—not only during quotation. The exact workflow varies, but the following six stages are common.

Identify missing measurements, construction risks, incompatible details, material assumptions, and approvals required before sampling.
Create the base pattern, test proportion, and prepare size grading according to the approved measurement strategy.
Source fabrics and trims, review minimums, approve color, and confirm substitutions before they affect the sample or order.
Evaluate fit, measurements, workmanship, fabric, color, decoration, labels, and unresolved design details.
Control cutting, sewing, external processes, measurements, appearance, workmanship, quantity, and final inspection.
Confirm labels, folding, polybags, cartons, marks, documents, inspection release, and shipping responsibilities.
VANRD explains its project stages through its sampling and production process. Timing should be confirmed only after the product, technical file, materials, revisions, quantity, production loading, quality requirements, and shipping plan have been reviewed.
A complete file may reduce clarification and preventable revisions, but it does not create a fixed universal lead time. Complex outerwear, custom fabric, washes, hardware, testing, repeated approvals, and seasonal capacity can extend development and production.
Common Tech Pack Mistakes and an Anonymized Project Example
Most tech-pack problems are not caused by one missing page. They occur when several unresolved assumptions reach the sample or bulk-production stage at the same time.
The factory can see the intended appearance but must guess measurements, construction, materials, and finishing.
Values are provided without showing where or how each POM is measured.
Descriptions such as “cotton fleece” omit composition, weight, construction, finishing, and approval reference.
Logo size and visual placement are shown, but no measurable reference points control production.
Comments are sent through messages, but the latest file and revision date are not updated.
The same tolerance is applied to different products, fabrics, washes, sizes, and measurement methods.
Labels, folding, polybags, carton quantities, marks, and barcode requirements are discussed too late.
The buyer and factory do not agree on inspection points, defect handling, or the release standard.
This example reflects a VANRD development scenario with identifying information removed. Results vary by product, material availability, revision scope, and approval speed.
- One model image and a general “oversized vintage washed hoodie” description
- No POM diagram, base-size measurement chart, fabric weight, or wash standard
- No controlled color reference or embroidery placement coordinates
The first sample required major fit, fabric, color, and wash corrections because the factory had to make assumptions.
- Front, back, and detail flats with seam and construction information
- POM chart, measurement method, fabric specification, and approved color reference
- Wash direction, artwork dimensions, placement coordinates, and revision log
The revised sample process became easier to evaluate because each comment could be checked against documented requirements.
Tech Pack vs Sample—and When a Manufacturer Can Help
A tech pack and a physical sample serve different but connected purposes. The technical file explains the intended construction and measurements; the sample confirms how those decisions perform in physical form.
| Aspect | Clothing Tech Pack | Physical Sample |
|---|---|---|
| Primary purpose | Provides measurable production instructions | Confirms the physical product result |
| Format | Digital or printed technical documentation | Physical garment |
| Controls | Measurements, materials, construction, artwork, labels, packaging, revisions | Fit, hand feel, drape, appearance, workmanship, and approved visual standard |
| Used by | Development, pattern, sourcing, production, and QC teams | Brand, buyer, development team, factory, and quality inspectors |
| Best practice | Keep one clearly dated current version | Identify the approved sample and any approved exceptions |
Yes. A manufacturer with ODM or product-development capability may create or refine technical flats, measurement sheets, material recommendations, construction notes, and production details from a clear brief or reference garment. The scope should be agreed before work begins, including ownership, revision rounds, grading, pattern development, and what is included in the service.
Even professionally created files benefit from factory review. Production teams can identify material, construction, machinery, sequence, and quality risks that may not be visible at the design stage. Review the manufacturer's factory and production capabilities in relation to the specific product category.
Tech Pack Readiness Checklist
Use this checklist before requesting a quotation or sample. The goal is not to reach an arbitrary score; it is to identify which decisions are approved and which still require factory input.
Style number, date, version, responsible contact, and revision history are clear.
Front, back, side, interior, and enlarged detail views show construction accurately.
Base-size values, measuring method, grading, and tolerances are documented.
Main fabric, lining, rib, trims, hardware, thread, labels, and packaging are listed.
Composition, weight, construction, finishing, performance, and approval references are included.
Textile references, physical swatches or lab dips, and colorway mapping are defined.
Method, file, dimensions, coordinates, colors, and surface effect are specified.
Seams, stitches, panels, lining, wash, bonding, or special processes are explained.
Content, placement, folding, polybags, cartons, barcodes, and marks are included.
Inspection points, approved sample, defect handling, and release responsibilities are clear.
Quality expectations should connect to the product and agreed inspection method. VANRD outlines its approach through its garment quality-control procedures.
Frequently Asked Questions
What is the difference between a tech pack and a fashion sketch?
Do clothing manufacturers require a tech pack?
Can I create a tech pack without technical design experience?
If I already have a physical sample, do I still need a tech pack?
How long does it take to create a qualified tech pack?
How many pages should a clothing tech pack include?
Can a manufacturer improve an existing tech pack?
Share your current tech pack, reference sample, sketches, or product brief with VANRD. The team can review the category, customization, missing technical information, material direction, and next development step before production planning.
Request a Tech Pack Review